Friday, May 19, 2017

Cor Kebab


A tongue thrilling experience for vegetarians especially, here the corn kernels, potato, onions and so on are mashed, mixed and deep fried to give it that crispy on the outside and soft inside texture that is just delectable.

Ingredients:
Baby Corn – 100 gms
Turmeric Powder – 1 1/4 tsp
Sweet Corn Kernels – 500 gms, boiled
Paneer – 250 gms, grated
Green Chillies – 1 tblsp, chopped
Ginger Garlic Paste – 1 tsp
Coriander Leaves – 2 tblsp, chopped
Kashmiri Red Chilli Powder – 1 tsp
Garam Masala Powder – 1 tsp
Tandoori Masala – 1 tsp
Salt – 1 1/4 salt
Oil

Method:
1. Wash and cook the baby corn in boiling water with a pinch of turmeric powder till tender.
2. Drain and keep aside.
3. Mix the corn kernels and paneer in a bowl.
4. Add the remaining ingredients except baby corn and oil.
5. Mix well.
6. Divide the mixture into equal portions and shape into balls.
7. Using a moist hand, fix the balls on to skewers, shaping them into 2 inch long kebabs along the length of the skewers.
8. Roast in an oven at 180C for 7 minutes.
9. Remove and baste with oil.
10. Roast again for 3 more minutes.
11. Remove the kebabs from the skewers and insert a baby corn at the end of each.
12. Serve hot with chutney.


Thursday, May 11, 2017

Rasmalai

Indian dessert recipe prepared from paneer balls or chenna and sugar and rabri / rabdi. the sweet is originated from bengal but hugely popular all over India.


In essence rasmalai literally means juicy milk cream. this is prepared very similar to rasgulla but served with thick creamed milk flavoured with kesar. also, it is topped with choice of dry fruits including pista, kaju and badam before serving.

While i am not a big fan of sweet dessert recipes. but my husband has always been a big admire of indian dessert recipes. perhaps he developed this taste for creamy based sweets during his stay in west bengal. as a matter of fact, he is so much addicted to sweets that he needs a dessert shot immediately after meal. rasmali is one such dessert which we prepare quite often. more importantly, the biggest advantage of this recipe is it lasts long for weeks if stored in fridge. also, the paneer balls can either be served as rasgulla if served with sugar syrup. and as rasmalai if served with milk cream.

Furthermore, i would like to share few tips and tricks for a perfect rasmali recipe. firstly, always and always use fresh full cream cows milk for better result. buffalo milk differs from cows milk in richness and composition and also high in calories. secondly, while forming paneer balls, make sure you do not have any cracks in it. otherwise, the paneer balls would dissolve in sugar syrup while boiling. lastly, knead the paneer or chenna properly till it forms dough and no granules are seen. do not over knead as chenna will start releasing oil, resulting hard rasmalai.

easy rasmalai recipe | easy rasmalai recipe
Author: Hebbar's Kitchen
Recipe type: sweet
Cuisine: Indian
Serves: 8 Servings
Ingredients
for chenna / paneer:
1 litre milk, full cream cows milk
2 tbsp lemon juice
1 cup water
for sugar syrup:
1½ cup sugar
8 cups water
for rabri / rabdi:
1 litre milk, full cream cows / buffalo milk
¼ cup sugar
½ tsp cardamom powder
2 tbsp saffron milk
7 pistachios, chopped
5 almonds, chopped
10 cashews, chopped

Instructions 

( 1 cup =255 ml)
chenna / paneer recipe:
firstly, boil milk.

additionally, add lemon juice and stir till milk curdles completely.

drain the curdled milk and squeeze off excess water.

after 30 minutes, start to knead the paneer for 10 minutes.

furthermore, make small balls and flatten. keep aside.

sugar syrup recipe:

firstly, take sugar and water.

boil the syrup for 10 minutes.

after that, drop the prepared paneer balls.

cover and boil for 15 minutes.

furthermore, squeeze of sugar syrup.

rabri / rabdi recipe:

firstly, heat milk and get to a boil.

once a layer of cream is formed over the milk, stick it to sides of vessel.

repeat the process for atleast 5 times or till milk reduces to one-third.

further, add sugar, cardamom powder and saffron milk.

give a good mix and get to boil.

also scrape off the collected cream from sides. and give a good stir.

further, refrigerate for 2-3 hours.

rasmalai recipe:

firstly, pour the chilled rabri / rabdi over the squeezed paneer balls.

finally garnish with few chopped nuts and allow to absorb for 2 hours.

How to make rasmalai recipe with step by step 

chenna / paneer recipe:

firstly, in a thick bottomed pan add 1 litre cows milk. make sure to use cows milk, else rasmalai will not be soft and juicy.

furthermore, stir occasionally and get to a boil.

additionally, add lemon juice and stir well.

add more lemon juice and stir till milk curdles completely and immediately drain the curdled milk into the hand kerchief / cheese cloth.

pour a cup of water and clean the paneer as it has lemon juice in it.

and repeat the gathering of cream to sides of kadai.

repeat the process for atleast 5 times or till milk reduces to one-third.

further, add sugar.

also add cardamom powder and saffron milk.

give a good mix and get the milk again to boil.

also scrape off the collected cream from sides. and give a good stir.

transfer to a bowl and let it attain to room temperature.

further, refrigerate for 2-3 hours before adding to rasmalai.

rasmalai recipe:

firstly, generously pour the chilled rabri / rabdi over the squeezed paneer balls.

also garnish with few chopped nuts and allow to absorb for 2 hours.

finally, rasmalai is ready to be served.

notes:

firstly, make sure to have enough room for paneer balls to swell while boiling.
furthermore, squeeze the sugar syrup from paneer balls well else it will no absorb rabdi milk.
additionally, add nuts of your choice.
also never use thin pan while preparing rabdi, as there are high chances for milk to burn.
finally, do not over stir the milk while preparing rabdi as the cream will not form.


Pav Bhaji

A spicy curry of mixed vegetables (bhaji) cooked in a special blend of spices and served with soft buttered pav (bread bun shallow fried in butter), is any Indian food lover’s dream. it is usually served for lunch or dinner, but not limited to have it as evening snack.


Pav bhaji is a famous street food Mumbai. pav bhaji is a curry with mixed vegetables and spices. all the vegetables are cooked well and than smashed to form a thick gravy. this spiced and aromatic curry is than topped with the finely chopped raw onions, coriander leaves and optionally with a lemon. this dish is most commonly served as evening snack or even for dinner in most of the houses. the key factor here is pav bhaji masala which is a blend of aromatic spices.It is a very popular Indian fast food dish common in Mumbai. Pav means bread and bhaji mean mashed vegetable dish. It is a spicy preparation with mixed vegetables in tomato gravy, topped with a dollop of butter. It is served with pav toasted with butter. It is easy to make Pav Bhaji at home. Today let us learn how to prepare Pav Bhaji at home following this very easy recipe with step wise pictures.

Secondly, pav bhaji can be an instant hit if you are organising a party at your home. moreover, if your kids hate to eat vegetables than this crushed vegetable bhaji can be very good option. certainly, all the proteins and minerals in vegetables would be consumed by the kids. i would highly recommend to have this dish for your unplanned party or even for surprised guests as this can be prepared easily and instantly.

Most commonly the vegetables used in this dish are french beans, capsicum, potatoes, cauliflower, peas and carrots. you can use all the vegetables or skip if you are running short of these vegetables. however, with each vegetable used the taste may vary. for this recipe refer my recipe card for the full vegetable list.

While making pav bhaji, I personally prefer to use the mtr brand of pav bhaji masala, but you could use any brand of your choice. check out my other snack recipes like bread masala, medu vada, goli baje, churumuri and mirchi bajji.

Prep time-5 mins
Cook time-25mins
Total time-30 mins

Pav bhaji | mumbai pav bhaji recipe

Author: Hebbar's Kitchen

Recipe type: street food

Cuisine: indian

Serves: 30 min

Ingredients

  • 3 potatoes
  • ¾ to 1 cup peas
  • 10 french beans
  • 1 large onion
  • 3 large tomatoes
  • 2 tsp ginger-garlic paste
  • 3 tbsp pav bhaji masala
  • 1 tsp chilly powder
  • ½ tsp turmeric powder
  • 1.5 to 2 cups water or add as required
  • 2 tbsp ghee
  • 2 tbsp butter
  • few coriander leaves
  • 1 lemon
  • salt as required

  • pavs for serving with the bhaji


Instructions ( 1 cup =255 ml)

  • boil the potatoes in a pressure cooker or microwave oven.

  • finely chop tomatoes and french beans. keep aside in a pan, add ghee / butter.

  • when the ghee melts completely, add ginger-garlic paste and saute till the raw aroma of the ginger-garlic paste disappears.

  • now add the tomatoes and fry them till they become soft and mush, till you fat releasing the sides. 

  • about 6 to 7 minutes on low to medium flame.

  • add the chopped beans and peas. saute for 2 to 3 minutes.

  • now add the boiled and pealed mashed potatoes.

  • add water and combine the mashed potatoes well with other vegetables.

  • now add the red chilly powder, turmeric powder, salt and pav bhaji masala.

  • mix the dry masalas well.

  • with a vegetable masher, mash the veggies directly in the pan.

  • occasionally stir the bhaji in a low flame for 8 -10 minutes.

  • check the taste. add salt and pav bhaji masala or red chili powder or butter if you require more spicy.

  • fry the pav in a tava or pan by cutting it horizontally. add some butter on top pav or bread.

  • your pava bhaji is ready.

Thi dish is my favourite to eat anytime, preferably in evening with friends or family. It is also available in party and marriage. One of the common dish available all around the India .


Wednesday, May 10, 2017

Paneer Recipes

 My first Paneer recipe Post in my Blog.I didn’t add any Garam Masala or Pav bhaji Masala. It tastes good with Nuts spice powder and Curry Powder. I didn’t grind Whole Garam Masala as it strong for My Kids. Once finish Cooking removes Bay Leaf and Cinnamon stick before serving. If you like the strong flavour of whole Garam Masala cook along with Onions and tomato and blend. You are going to like the New taste of Paneer Masala with Nuts spice Powder and with Curd ( yoghurt). You can use Home made paneer or Good quality store bought Paneer. Paneer is a good source of Protein and Calcium for Vegetarians. The rich supply of essential Vitamins and Minerals in Paneer helps boost bone growth and development in Children. Along with proper diet, Healthy hair needs essential fatty acids. Inadequate Protein intake can cause major hair fall. The simple and easy recipe which needs 5 plus 5  minutes Cooking time on Stove.


Ingredients

1.Paneer (Indian Cheese) – 12 Long cubes

2. Onion – 2 Medium ( Chopped)

3 . Tomato – 3 ( Chopped)

4. Ginger – small piece

5. Garlic cloves – 4

6. Oil – 2 tbsp and ghee – 1/2 tbsp

7. Spice Powder with Nuts: Dry roast 10 Almonds, 10 Pistachio's,  10 Walnuts,  5 Cashews,1 tbsp Coriander and cumin seeds each, Fenugreek seeds ( Methi) – 10, Red chilli – 1 or 2.

8. Curry Powder – 1/2 to 1 tbsp ( Blend of red chilli Powder, Coriander and cumin powder, Garlic cloves and coriander leaves with stems)

9. Whole Garam Masala – Bay Leaf – 1, Cloves – 5, Cardamom – 3, Cinnamon – small stick.

10 . Water – 3/4 the cup

11. Finely chopped Coriander and Cumin seeds.

12. Curd ( plain Yoghurt) – 1/4 th cup

Method

1. Dry roast Almonds, Pistachio’s,  Walnuts and Cashews with Coriander seeds, cumin seeds, Fenugreek seeds, Red chillies. Cool the Spices before you grind.

2. Heat a tbsp oil and Cook Onions, Tomatoes and Garlic. Cool before grinding.

3. Grind the Spice Powder. Then add Onion tomato mixture, salt, Curry powder, Turmeric, Ginger and Half glass Water. Blend into a Smooth 

4. Heat 1 tbsp Oil and 1/2 tbsp Ghee and add 1 tbsp Cumin seeds and fry for Couple of Minutes. Then add Onion tomato mixture, 1/4 th cup curd( yoghurt). add Paneer Cubes. Mix well. Cook on Medium High flame for 5 minutes. Stir in between to avoid burning.

5. After 5 minutes switch off the stove and add finely Chopped Coriander and mint Leaves. Check for Salt and Spices and adjust accordingly.

Paneer Bhurji Recipe

How many times it has happened with you that either you do not have nicely shaped / cubes of paneer or you do not elaborate set up (or time) of making ravishing paneer dish?

Paneer bhurji is a delightful and spicy paneer dish which is quick and easy to make with ingredients that you will normally have in your kitchen. Paneer bhurji is made from crumbled paneer simmered in spicy tomato gravy. It tastes great with roti, paratha or even you can have it with a regular toast bread. It also makes a good stuffing for dosa and vegetable Frankie / Kathi rolls. Normally I make Paneer Bhurji from my homemade paneer, which is left after cutting portions for other paneer dishes.

You can find its few variants, some are dry paneer bhurji, some with gravy, some with or without onion. The following step by step recipe is for a dry version using onion, however, by all means, it can be made without onion. It is one side dish that you will find easily on an Indian Dhaba.

Preparation time: 5 minutes

Cooking time: 15 minutes

Serving: 4

Ingredients:

Paneer/Indian cottage cheese – 250 grams 
Onion  – 1 (big sized)
Tomatoes – 2 (medium sized)
Green chillies – 2
Grated Ginger – 1 tablespoon
Cumin seeds – 1 teaspoon
Turmeric  powder – 1/2 teaspoon
Red chilli powder – 1/3 teaspoon
Coriander powder – 1 teaspoon
Garam Masala – 1/3 teaspoon
Salt – 1 teaspoon or as per your taste
Oil / ghee – 1.5 tablespoon 
Chopped coriander leaves  – 1 tablespoon 

Recipe : 

1. First of all, crumble the paneer and keep it aside. Chop onion, tomatoes and green chillies. 

2. heat oil/ghee in a pan. Once it’s warm, add cumin seeds and let them get browned. Now add onions and sauté till they become translucent.

 3.Add grated ginger and green chillies to it and sauté again. Now add all the spices and roast for 1 minute.

4.Add tomatoes and cook till they become soft. Add the crumbled paneer, mix it well and let it cook for 1 to 2 minutes. Switch off the heat. 

5.Garnish with chopped coriander leaves and serve paneer bhurji with bread of your choice. 

Key notes:

Don’t over cook the bhurji once you added crumbled paneer as it will make the paneer hard.
You can add green peas to the bhurji as well. Just add at the time when tomatoes are cooked and cover with lid so that peas are soft and cooked properly. 

You can use white onion, then the onion won’t darken after frying, else red onions tend to become dark.


Parathas or Flatbreads

Indian food is wholesome and tasty and flavorful and honestly? So yummy (not biased what so ever…nope). Potatoes are a universal staple in almost every cultural diet. You can do anything you want to them: peel them, boil them, mash them, shred them, fry them, puree them… I think you get the hint. I don’t think I have ever had a potato dish I didn’t like. Mmmm potatoes

Paranthas are a version of potato pancakes. It’s potatoes baked inside bread/dough. You’re probably thinking “oh that doesn’t sound like anything amazing” but it’s all about the potatoes that go inside the dough. It’s all about the flavours and seasoning.

Personally, I usually love eating paranthas on Sundays aka. lazy Sundays where I don’t do much but be with family and eat good food. So today after waking up from a late Saturday night I decided nothing would be better than a buttery paratha. (Originally this was supposed to be posted yesterday but my internet died *shakes fist* but paranthas are good any day of the week!)

Paranthas require two separate parts for the recipe: one for the dough (super simple) and one for the potatoes (not complicated but takes a little more time and care). The recipe for paranthas I am going to share is really by hand and not measured at all. It really depends on how many potatoes you use and because the dough is really easy to make, you can just play it by ear. Follow me for the recipe!


There are so many different types of Parantha that I can;t even count. But there are some popular ones , I am going to share the recipe with you.
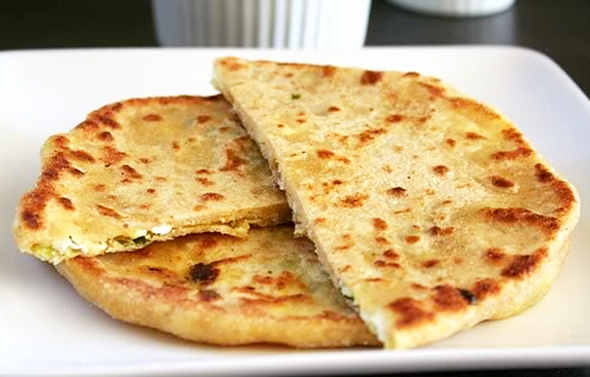
1. Aloo Parantha

SIDE DISH FOR ALOO PARATHA

Aloo Paratha is served with pickle and yogurt and does not require an additional curry or side dish to go with it. You can also serve with Dal Makhani or Dal Tadka (Indian Lentil Curry). But for me, the paratha itself is quite filling.

HOW TO MAKE ALOO PARATHA AT HOME

The potatoes are boiled and mashed at first and are then mixed with spices. Aloo Paratha is slightly tangy and spicy due to the addition of dry mango powder or Aamchoor powder and green chillies. A portion is stuffed in the prepared dough and is rolled to a thick paratha. It is then cooked on both the sides, sprinkling oil/ghee/butter. I have prepared a no onion – no garlic recipe here.

TIPS TO MAKE GREAT ALOO PARATHA AT HOME

CHEF SAYS:

Knead the dough until it is soft. If your dough is hard, it will break while rolling.

Mash the potatoes well, until no big chunks of potatoes remain. Also, let it cool down completely before you start stuffing. This is again, to avoid breaking while rolling.

Also, be gentle while rolling, else the stuffing will come out.

While cooking, one should make sure that the griddle/Tawa is hot and that the dough is cooked well until dark brown spots appear on it. Be generous in smearing the ghee or oil for even cooking.

Press with a ladle after you have seen brown spots on both the sides and you can watch the Paratha puff up. Woot woot!

Oh, my very first Aloo Paratha was fantastic. But the pictures turned out awful. The second time was even worse. And while I was feeling let down and dejected, my neighbour came like a fairy Godmother and decided to help me out.

2. Gobi Parantha

OUR INDIAN FLATBREAD STUFFED WITH IN-SEASON CAULIFLOWER, A FAVORITE BREAKFAST RECIPE.

This recipe is quick, simple and good to taste. If you are in for a little bit of oil for breakfast, then nothing better than a homemade Gobi paratha on a foggy winter morning, served with ‘makhan’/ butter and spicy pickle. In fact, try pairing it with our quintessential green coriander chutney and you’ll love it.

INGREDIENTS( MAKES 6-7 MED PARATHAS, SERVES 2-3):


  • A small cauliflower floret, grated and slightly sautéed with a little sprinkle of water,
  • 1 small onion, finely grated or chopped,
  • 2-3 small green chillies, finely chopped,
  • Handful of coriander, finely chopped,
  • 1 tsp of ajwain or carom seeds,
  • Salt to taste,
  • Oil for preparing parathas,
  • 2 cups of whole wheat flour, made into dough

PREPARATION:

1. Mix the grated cauliflower, onions, chillies, coriander, ajwain and salt together and set aside. Ensure that the filling is free of water or moisture content. For this you can even strain the mixture, to rid it of any water.

2.Divide the whole wheat dough into 6-7 medium sized balls.

3.Now roll out one by one, smearing a little oil across the rolled ball.

4.Put the cauliflower filling in between and sprinkle it back with some more flour. This should be done to avoid the parathas from bursting open.

5.Now carefully join the sides or flaps of the rolled out paratha across the filling like an envelope. It should resemble a small sized ball again.

6.Toss it in a little flour and roll out again carefully so as not to tear the paratha.

7.Put a ‘tawa’ or a flat saucepan onto the stove. Let it be well heated before placing the rolled out paratha on it.

8.Cook well before flipping the paratha. Now smear oil on top of the paratha and flip it again, to repeat the same process on the other side as well.

9.The paratha should be well done, on both the sides, before being served with a rich dollop of homemade butter or hot pickle.

3 Paneer Parantha

Paneer paratha is a traditional North Indian paratha loved by all. It is easy to make and taste delicious. Paneer paratha is great for entertaining guest for breakfast, weddings or any special occasions. Paneer is obtained by curdling hot milk with lemon or citric acid. Due to its non-melting quality, it is used in a variety of dishes. Paneer paratha is made with whole wheat flour dough and crumbled fresh paneer is used for stuffing which is mixed with herb spices and chopped onion to make these parathas very flavorful. There are many variations could be made with paneer stuffing by adding some vegetables like grated cauliflower, potatoes and spinach. Try to make paneer parathas and make a variation with the ingredients.  

Ingredients for Dough:

2       Cups of whole wheat flour
1       Cup of water or as needed to make
         the dough

Ingredients for stuffing:

1½    Cup crumbled paneer
2       Tablespoons finely chopped  
         coriander leaves   
2       Medium green chilli- finely chopped
½      Teaspoon red chilli powder
1/4    Cup of finely chopped onions
1       Teaspoon salt or to your taste

Vegetable oil for making the parathas

Directions for making the dough:

1. Add the whole wheat flour in a mixing bowl, 
Add a little water at a time and mix it with flour in a rotating motion from the centre of the bowl to outward until it forms a dough and it cleans the sides of the bowl, knead it for few minutes, until the dough become soft and just the right rolling consistency.

2. Knead the dough with wet hands make a ball and put back into the bowl, then cover it and keep aside for at least half hour. Dough maker or food processor could be used to make the dough.

Directions for making the dough:

1.    Paneer you could either buy the brick from the store then crumble it or you could make it at home.(How to make paneer at home)

2. Mix chopped coriander leaves, chopped green chillies, red chilli powder, and chopped onions in the crumbled paneer. Add the salt at the time of preparation.

3. If you wish to add more spices because paneer does not have much flavour you need to spice up.

Directions for making of the paneer paratha:

1. Preheats the tava (griddle) on medium heat and grease it with a little oil.

2. Take some extra flour in a plate for dusting.

3. Knead the dough with wet hands for a minute, and then roughly divide the
    dough into 10 to 12 equal parts without forming into the balls.(Size of the ball
     depends on how thick you want to make the parathas)

4. Dust your hands lightly with the extra flour and take a portion of the dough and
    roll it in between your palms into a ball.

5. Place the ball of dough into flour and press flat, dusting on both sides.

6. Now place the dough on the rolling board or chackla (Indian roti rolling board)
    and with the help of a rolling pin roll into a thick small circle.

7. Now place about 1½ tablespoon of stuffing in the center of the circle. Fold the edges inwards like you do in a dumpling, ensuring that no filling is exposed.

8. Place stuffed ball into the flour and press gently, dusting on both sides.

9.  Now place the ball on the rolling board, and very gently roll the ball into a 6”  circle, dusting when required. Keep in mind that stuffing should not come out and it spread evenly, all through if little bit stuffing comes out do not get panic it requires little practice.

10. Now pick the paratha,  pat between your hands for few seconds to shake off
      the excess flour.

11.  Place the paratha on the hot greased tava (griddle), and let it cook.

12.   In about 30 seconds the little bubble will start appearing, with the help of spatula turn the paratha over to the other side and cook for 30 seconds. If paratha sticks to the tava (griddle), it is not hot enough, if it is too dark or burns it means it is too hot adjust the heat accordingly.

13.   Drizzle ½ teaspoon of oil over the paratha and with the spatula spread evenly, turn over the other side, drizzle and spread ½ teaspoon of oil and let it cook.

14.  With the spatula press down gently all over the surface of the paratha in the circular motion on both the sides to make it crispy. Keep flipping the paratha back and forth few times for 3 to 4 minutes or until both sides become light brown and you have the desired crispness take the paratha off the griddle.  Serve paratha hot.

Tips:

1. If you have trouble rolling the stuffed ball of dough, then make two thin 6 inches roties. Add the filling to the one roti and spread all over the surface.

2.  Cover the stuffing with the second roti. Gently with the palm press the paratha to let the air out, then with the fingers press the edges to seal and vary lightly with the palm press the paratha so that stuffing settle down in the paratha, then lift the paratha and place over the hot griddle and follow the above process for cooking.

3.   For better result use fresh crumbled paneer


Mixed Lentils and Vegetable Khichdi

Mixed Lentils & Vegetables Khichdi 

A vegetarian, one-pot, gluten free dish with lentils, rice and vegetables, cooked in ghee, turmeric and red chili powder makes an amazingly flavorful comfort meal!

Khichdi, Khichadi or Kitchari is a nourishing porridge-like dish cooked with lentils and rice. Referred to as the Indian “comfort food”, it is often used for babies and the elderly, a healthy meal that is easy to chew, digest and SO good for the body!


I grew up eating khichdi for a LOT of dinner meals. My mum cooked this soft, mushy and lightly spiced dish that was so comforting and light that it always made a  perfect dinner. She had many variations of this dish, so when someone asks me about khichdi, there are so many different recipes that come to my mind.

Although I want to share some of my mum’s khichdi recipes, I want to share this one that I started making years ago. When the boys were little and I was working crazy hours, picking them from day care and then trying to figure out our dinners, this dish has come to rescue so many times! It helped me serve healthy, wholesome and guilt-free dinners that we all enjoyed.

This khichdi recipe was developed over the years, adding and changing the combination of vegetables and spices so as to not overpower the dish. I now have a recipe that I love and is my signature dish! A recipe I was so proud to share with my mum, who absolutely loves it and has on a repeat list.


Recipe


Mixed Lentils & Vegetables Khichdi 
Author: Archana Mundhe
Recipe type: Entree Cuisine: Indian
Prep time:  10 mins Cook time:  30 mins Total time:  40 mins
Serves: 6
Mixed Lentils & Vegetables Khichdi - Healthy, wholesome, one pot dish with lentils, rice and vegetables, cooked in ghee, turmeric and red chilli powder makes an amazing comfort food!
Ingredients
2 tbsp ghee
1 tsp cumin seeds
1 tbsp ginger
1 carrot, peeled and sliced
¼ cup green beans, chopped
¼ cup frozen green peas
1 red potato, cubed
1 tomato, diced
1 cup cauliflower, chopped
1 cup cabbage, chopped
1 cup spinach, chopped
½ tsp turmeric
2 tsp mild red chili powder
2 tsp salt
1 cup white rice
1 cup mixed lentils(moong, masoor, toor and chana daal)
6 cup water
¼ cup cilantro, chopped, for garnish


Instructions

Turn Instant Pot to Saute Mode. Once the ‘hot’ sign displays, add ghee, cumin seeds and ginger.
Cook for 30 seconds. Add all the vegetables (carrots, beans, peas, tomato, potato, cauliflower, cabbage and spinach). Mix well.

Add turmeric, red chilli powder and salt. Mix well.

Add rice and mixed lentils. Add 6 cups of water. Give everything a quick stir and close IP lid with a pressure valve to sealing.

Press the rice button (12 mins) followed by NPR. Open IP, garnish with cilantro.

Serve hot with roasted papad and pickle.

Oats Khichdi Recipe

INGREDIENTS (240 ml cup used)

Moong dal – ¼ cup
Oats – ½ cup
Cumin – ½ teaspoon
Ginger – ½ teaspoon, grated or crushed
Water – 1 ¾ to 2 cups (regular rolled oats may need more)
Salt – as needed
Ghee- as needed
Turmeric – generous pinch
Asafoetida – a pinch (optional)
Seasonal vegetables – ½ to ¾ cup, chopped (use any seasonal vegetables available: carrots, beans, onion, capsicum, cauliflower etc.)

INSTRUCTIONS

Wash and soak moong dal in water and set aside. Wash and chop the vegetables into small cubes.

Add about one tablespoon of ghee to a pressure cooker. As the ghee becomes warm add cumin seeds to the ghee and when they start crackling, add ginger and keep stirring.  After this, you can add asafoetida, though it is optional.

Add all the vegetables and sauté for about 2 to 3 minutes on medium flame. Drain the water from dal and add it to the cooker. Fry the mixture for about 2 to 3 minutes till the dal appears to be roasted.

Add oats, salt and sauté for about 2 minutes. Be careful so that none of the ingredients stick to the bottom of the cooker; reduce the flame if necessary and pour water. You can adjust the quantity of water to make it soft or slightly grainy as you want it to be. Put the lid of the pressure cooker and on a medium flame, pressure cook for one whistle.

If desired can add little more ghee. This khichdi can be enjoyed by adults as well. This is a good dish if you are looking for a low-calorie food item. You just need to avoid the ghee and use low fat oil instead.

Serve oats khichdi warm.

Nutritional value

Oats are rich in dietary fiber and aid in digestion and stool formation. One cup of dry oats contains 307 calories and is rich in manganese, selenium, phosphorus, magnesium, carotenoids, vitamin E and flavonoids.


Urad Dal Khichdi

INGREDIENTS (240 ml cup used)

Rice (white, short-grain or long grain) – 5 tablespoon

Urad dal – 5 tablespoon

Water – 1 ½ cups

Seasonal vegetables like carrot, pumpkin, bottle gourd, ridge gourd, spinach – 1 cup, cubed
A generous pinch of cumin seeds

Salt – to taste

Ghee – 2 teaspoon

INSTRUCTIONS

Wash rice and dal together and soak for about 4 hours. Drain and set aside.

Method 1

On a low flame cook the rice, dal, vegetables and salt in a pressure cooker with 1 and a half cup of water for 2 whistles.

When the pressure goes off; mash the rice, dal and vegetable mixture into a coarse mixture.
In a tempering pan, heat ghee, add cumin seeds. Once the seeds start spluttering, pour it over the khichdi, mix well and serve.

Method 2 (for fussy kids)

Heat ghee in a pressure cooker, add cumin and allow them to crackle.

Add the drained rice and dal. Sauté the rice and dal mixture in ghee for 1 to 2 minutes until the dal smells good then add the vegetables.

Add salt, one and a half cups of water and pressure cook for 2 whistles.

When the pressure goes off, mash coarsely and serve.

NUTRITIONAL VALUE

Ural dal is one of the richest sources of protein and vitamin B. It also contains iron, folic acid, calcium, magnesium and potassium. Urad dal is a good source of dietary fiber and iron.

11 Traditional Indian Foods you do not want to miss

1. Biryani


What It Is: An aromatic rice dish cooked with several spices, notably saffron, and a protein (typically chicken or mutton) that's been marinated.
Perfect For: A huge family dinner.
There are several main types of biryani, and they are also specific to a certain community. Here are just a few of them:

Sindhi biryani: The exotic and aromatic type of biryani is popular in Pakistan and known for its spicy taste, fragrant rice, and delicate meat. It is made with meat and Basmati rice, vegetables and various types of spices. 
Hyderabadi biryani: This biryani is one of India's most popular types of biryani. It incorporates goat meat that is marinated and cooked along with the rice and has coconut/saffron seasonings. 
Malabar Biriyani: this is the only version of Biryani in Kerala, an Indian state. It is a popular dish eaten by the Malabar Muslim community and incorporates Khyma rice, which is mixed with ghee.
Calcutta/Kolkata biryani: This biryani mostly uses potatoes and eggs. It is much lighter spice wise, and only sometimes contains meat. The marinade is made of cinnamon, nutmeg, cloves, cardamom and other spices, and the rice is flavoured with ketaki or rose water and yellow in colour.
Ambur biryani: This leather tanning city in Tamil Nadu makes one of the most famous types of biryani, and the town has more biryani shops than any other city in the world. 

Lucknowi biryani: This type of biryani is based on a Persian cooking style so it uses the dum pukht method where the meat and gravy are only cooked partially and are then layered and served in a sealed handi. The spice profile is not as intense. 

Mughlai biryani: This biryani is cooked with curd, chicken, almond paste, ghee, dry fruits, and green chillies, and has a rich flavour. 

Kalyani biryani: Small chunks of buffalo meat go into this form of biryani, which is known as the "poor man's Hyderabadi biryani." It is rich and flavorful but does not include more expensive ingredients.

2. Idli


What It Is: A heavy South Indian breakfast food. A fermented batter of ground rice and lentils, steamed in little circular moulds.
Perfect For: When you're done sleeping in on a Saturday morning.
Feels Like: Being woken up by the smell of cooking.

I've never been overly fond of idlis and yet it's almost always in the mix whether I'm fixing breakfast at home or eating breakfast on the go. It's easy (if you've got the batter tucked away in your refrigerator), it's nutritious and it's steamed - making it absolutely safe even in the dingiest highway restaurant. If you thought that there's just one way to make an idli, think again. The idli doesn't just come in many shapes and sizes, it also comes with markedly different flavours depending on which part of Tamil Nadu, Karnataka or Kerala you're at. 

3. Gulab Jaamun


What Is It: Small balls of dried milk, slow cooked and boiled in a sugar syrup.
Perfect For: When you've already had a delicious meal and have just enough room for dessert.
Feels Like:  When start eating them feel like put one after another in the mouth without stopping. They are best for me when served hot. Some people alo try ice cream with Gulab Jamun. 

4. Chole Bhature


What It Is: A spiced, curried chickpea dish served with a fried flour bread.
Perfect For: A late Sunday breakfast or a weekend breakfast. Children's , Adults everybody love this food. Popular on holidays or a family get together.
Feels Like: Seeing your family all dressed in new clothes on a festival day. 

5. Kati Roll


What It Is: A traditional street food popular across India (and abroad). A wrap of kebabs, eggs, vegetables, and spices rolled into paratha (a type of flatbread).
Perfect For: When you need a meal on-the-go. Also, a great way to use up leftovers.Perfect for students in college or friends get together in the evening in there near the market.
Feels Like: Standing on a dusty Kolkata street-corner at dusk, watching families go home through rush hour traffic.

6. Rajma


What It Is: Kidney beans in a thick gravy popular across North India.
Perfect For: An accompaniment for rice, particularly delicious when served piping hot in the winter. Indian families love to eat this in the afternoon on weekend as it consume lot of time while preparattions.
Feels Like: Summer holidays at your grandparents' house oR Bua house.

7. Pani Puri


What It Is: A small crisp hollow round bread filled with spiced water, tamarind paste, potato, onion, and chickpeas.
Perfect For: When you're craving a thousand flavours at once.The perfect time is the evening time or in a marriage or the party. Ladies or girls are crazy about this dish in India.
Feels Like: Drunkenly challenging your best friend to a contest of who can eat more of these, and then feeling like your mouth is on fire.

8. Jalebi


What It Is: A wheat flour batter deep fried in coil-shapes and soaked in sugar syrup, served hot.
Perfect For: When you want something hot, but also sweet.  In winter time people take it in milk as well in night and it make you tummy so heavy that you feel like going to bed straight away. Many Indian festivals or Puja's it is used as Prasad for god like in Diwali.
Feels Like: People-watching in a crowded bazaar while your mother haggles over sari prices.

9. Tandoori Chicken


What It Is: Chicken marinated for hours in a paste of yogurt and spices, and then roasted (traditionally) in a clay oven called a tandoor.
Perfect For: Wowing your dinner guests with minimal effort.
Feels Like: Making a pitstop at a roadside diner three hours into a family roadtrip.

10. Baigan Bharta


What It Is: Roasted eggplant mashed together with a variety of other vegetables and spices, served with flatbread.
Perfect For: An exciting and fancy vegetarian meal  and so tasty when you eat with naan or chapati. 
Feels Like: Going back fto school time when my mom put this in my lunch.

11. Dosa


What It Is: A crispy, flat bread (similar to a crepe or pancake) made of rice batter, served with a lentil sauce (sambar) and a variety of chutneys.
Perfect For: When you want breakfast to be the highlight of your day or lunch or dinner. Perfect to eat during any time of a day. Very light , you feel hungry after few hours.
Feels Like: Recounting last night's events the morning after a sleepover.


Cor Kebab

A tongue thrilling experience for vegetarians especially, here the corn kernels, potato, onions and so on are mashed, mixed and deep frie...